The Challenge of Combining Dates in Excel: Beyond Simple Concatenation
Working with dates in Excel is a fundamental skill for data analysis, reporting, and organization. Whether you're tracking project deadlines, recording sales transactions, or managing employee schedules, dates are ubiquitous. Often, you'll find yourself needing to combine dates with other pieces of information, such as names, events, or specific descriptions, into a single, cohesive cell. While Excel offers powerful tools for text manipulation, directly merging dates can sometimes lead to unexpected results, primarily because Excel stores dates not as they appear, but as serial numbers. This internal representation, while efficient for calculations, can be a hurdle when you simply want to display a date neatly alongside other text.
Imagine you have a list of employee names and their start dates, and you want to generate a sentence like "John Doe started on 01-Jan-2023." A straightforward concatenation attempt might turn that date into a cryptic number, completely losing its meaning. This is where the TEXT function becomes your indispensable ally. In this comprehensive guide, we'll explore how to master date merging in Excel, focusing on the powerful combination of the CONCATENATE function (or its modern equivalent, CONCAT, and the & operator) with the crucial TEXT function to ensure your dates always appear exactly as you intend.
Why Excel Treats Dates as Numbers (And Why It Matters for Merging)
Before diving into the solutions, it's essential to understand Excel's unique approach to dates. Unlike text strings, which are stored as characters, Excel internally stores dates as sequential serial numbers. By default, January 1, 1900, is serial number 1, and each subsequent day increments that number. So, for instance, January 1, 2023, might be represented as 44927. This system is incredibly efficient for performing date-based calculations (like finding the number of days between two dates) but becomes problematic when you try to combine dates directly with text.
When you use a function like CONCATENATE or the & operator on a cell containing a date, Excel often retrieves this underlying serial number rather than its formatted appearance. This results in output like "John Doe started on 44927," which is far from user-friendly. To overcome this, we need a way to tell Excel: "Don't give me the serial number; give me the date as a formatted text string." This is precisely the role of the TEXT function.
Mastering the `TEXT` Function for Seamless Date Merging
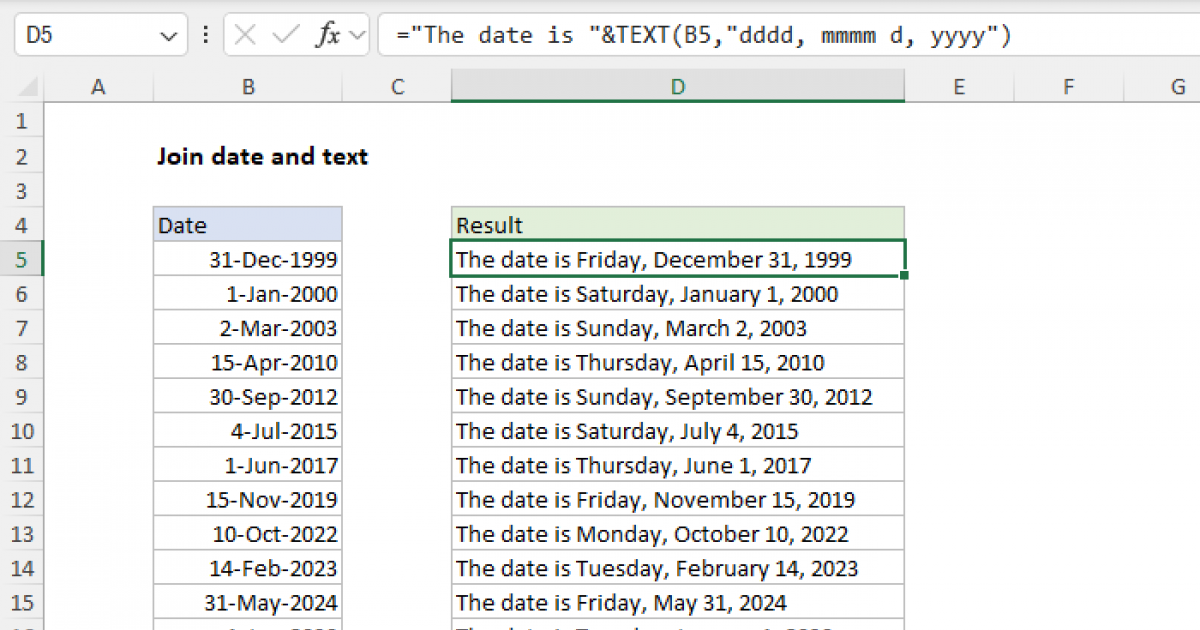
The TEXT function is your key to unlocking effective date concatenation in Excel. It converts a numeric value (like Excel's date serial number) into a text string, allowing you to specify the exact format you want that text string to take. Its syntax is straightforward:
=TEXT(value, format_text)
value: This is the number you want to convert to text. In our case, it will be the cell reference containing your date (e.g.,B2).format_text: This is a string enclosed in double quotes that specifies the desired display format for the number. For dates, this is where you define how the date should look.
The power of the TEXT function lies in its extensive range of format_text options. Here are some common examples for dates:
"dd/mm/yyyy": Displays as "01/01/2023""mm/dd/yyyy": Displays as "01/01/2023""dd-mmm-yyyy": Displays as "01-Jan-2023""mmm dd, yyyy": Displays as "Jan 01, 2023""dddd, mmmm dd, yyyy": Displays as "Sunday, January 01, 2023""d-m-yy": Displays as "1-1-23"
By using the TEXT function, you instruct Excel to take the date in a cell, convert it into a string formatted precisely to your specifications, and then pass that string to the concatenation formula. This crucial step ensures that your merged output is always legible and professionally formatted.
Combining Dates with `CONCATENATE` and `TEXT` (Method 1)
The CONCATENATE function (or its more modern equivalent, CONCAT, which handles arrays better) allows you to join multiple text strings into one. When combining dates, the trick is to use the TEXT function as one of the arguments within CONCATENATE. Let's walk through an example.
Consider a scenario where you have a list of individuals, their dates of birth, and their places of birth, and you want to create a descriptive sentence for each.
Input Data:
- Column A: Name (e.g., "Daniel")
- Column B: Date of Birth (e.g., 05/09/1999)
- Column C: Place of Birth (e.g., "Canada")
Incorrect Attempt (without TEXT function):
If you tried a simple concatenation like:
=CONCATENATE(A2, " is born on ", B2, " in ", C2)
The output would likely be something like:
"Daniel is born on 36413 in Canada"
This is because B2 (05/09/1999) is treated as its serial number.
Correct Method (using TEXT function):
To rectify this, we integrate the TEXT function directly into our CONCATENATE formula:
=CONCATENATE(A2, " is born on ", TEXT(B2, "DD-MMM-YYYY"), " in ", C2)
Let's break down this formula:
A2: The name "Daniel"." is born on ": A literal text string.TEXT(B2, "DD-MMM-YYYY"): This is the vital part. It takes the date from cell B2 (05/09/1999), converts it into a text string, and formats it as "05-Sep-1999"." in ": Another literal text string.C2: The place of birth "Canada".
The resulting output in your target cell (e.g., D2) will be:
"Daniel is born on 05-Sep-1999 in Canada"
This method ensures that your dates are presented clearly and professionally within any concatenated string. For more detailed insights into this conversion process, refer to our guide on Excel Date Concatenation: Convert Numbers to Dates with TEXT.
The `&` Operator: A Simpler Alternative for Combining Dates (Method 2)
While CONCATENATE is effective, many Excel users prefer the simpler and more versatile ampersand (&) operator for joining strings. It achieves the same result as CONCATENATE but with a more concise syntax. Just like with CONCATENATE, the key to successfully merging dates with the & operator lies in using the TEXT function.
Let's revisit our previous example using the & operator:
Input Data:
- Column A: Name (e.g., "Daniel")
- Column B: Date of Birth (e.g., 05/09/1999)
- Column C: Place of Birth (e.g., "Canada")
Using the & operator with TEXT function:
=A2 & " is born on " & TEXT(B2, "DD-MMM-YYYY") & " in " & C2
This formula yields the exact same desired output: "Daniel is born on 05-Sep-1999 in Canada." Each & symbol acts as a connector, joining the different parts of your string together. The flexibility of the & operator also allows you to easily insert delimiters or additional text directly between your combined elements.
Custom Formatting for Your Concatenated Dates
Before even beginning the concatenation process, it's a good practice to ensure your source date cells are formatted correctly for display. While the TEXT function handles the formatting for the output string, having consistent input formatting can prevent confusion. Right-click on your date cell, select Format Cells, and then choose Custom. Here, you can enter format codes like "mm/dd/yyyy" or "dd-mmm-yyyy". This doesn't affect how Excel *stores* the date (still a serial number), but it dictates how it *displays* it in the cell, making it easier for human eyes to read.
However, remember that this cell-level formatting is distinct from the format_text argument used within the TEXT function. The TEXT function's formatting takes precedence for the concatenated output. For a deeper dive into the nuances of the TEXT function and its powerful formatting capabilities, check out our guide on Master Concatenate Dates in Excel: TEXT Function Guide.
Practical Tips and Advanced Considerations for Date Merging
While the TEXT function combined with CONCATENATE or & operator provides a robust solution, keeping a few practical tips in mind can streamline your workflow and prevent common pitfalls:
- Choose the Right Format String: Carefully select your
format_textargument. Different regions and contexts require different date formats. "dd/mm/yyyy" is common in Europe, while "mm/dd/yyyy" is standard in the US. Ensure your choice matches the intended audience and purpose. - Handling Time with Dates: If your cells contain both date and time information, the
TEXTfunction can also format the time. For example,TEXT(A2, "dd-mmm-yyyy hh:mm AM/PM")would display "01-Jan-2023 03:30 PM". - Dealing with Empty Cells: If some of your date cells might be empty, your concatenation formula might display an error or "00-Jan-1900" (Excel's default for serial number 0). You can wrap your formula with an
IFstatement to handle this gracefully:=IF(B2="", "", A2 & " started on " & TEXT(B2, "DD-MMM-YYYY"))This checks if B2 is empty; if so, it returns an empty string, otherwise, it performs the concatenation. - Use Named Ranges for Clarity: For complex formulas, consider naming your date ranges (e.g.,
StartDateinstead ofB2). This makes your formulas more readable and easier to debug. - Newer Excel Versions – `CONCAT` vs. `CONCATENATE`: While `CONCATENATE` is still widely supported, newer versions of Excel (Excel 2016 and later) introduce the `CONCAT` function. `CONCAT` is generally preferred as it handles range references more efficiently (e.g., `CONCAT(A2:C2)`). However, for combining distinct cells with text, both work similarly when using the `TEXT` function.
By understanding Excel's date system and leveraging the power of the TEXT function, you can confidently and precisely combine dates with any other data, ensuring your spreadsheets are not only functional but also perfectly presentable.
Conclusion: Simplifying Your Date Merging Tasks
Concatenating dates in Excel doesn't have to be a source of frustration. By understanding that Excel treats dates as serial numbers and employing the versatile TEXT function, you gain complete control over how your dates appear in merged strings. Whether you prefer the explicit structure of CONCATENATE or the concise nature of the & operator, incorporating TEXT(date_cell, "format_text") is the indispensable step. This powerful combination allows you to transform raw date data into beautifully formatted, human-readable text, simplifying your data presentation and enhancing the clarity of your reports. Master these techniques, and you'll streamline countless Excel tasks, making your data not just accurate, but also effortlessly understandable.