Mastering Excel Date Concatenation: Convert Numbers to Dates with TEXT
Excel is an indispensable tool for data management, but sometimes its powerful features can present unique challenges, especially when dealing with dates. One common scenario is needing to
combine dates with other text or data points into a single, cohesive string. While Excel offers various concatenation methods, a frequent hurdle arises: dates often appear as confusing serial numbers rather than their familiar format. This is where the mighty `TEXT` function becomes your best ally, allowing you to convert these underlying numerical values into perfectly formatted dates, ready for seamless integration.
Imagine you're compiling a report, and you need to present "Employee X started on [Date]" or "Project Y deadline is [Date] in [Location]". Simply joining a date cell with text often results in an unreadable numerical value (e.g., "Employee X started on 44927"). Understanding how to use the `TEXT` function in conjunction with concatenation operators like `&` or the `CONCATENATE` function is crucial for transforming raw data into clear, professional output. This article will guide you through the process, ensuring your Excel date concatenations are always accurate and visually appealing.
The Challenge: Why Excel Dates Become Numbers During Concatenation
At its core, Excel stores dates as serial numbers. January 1, 1900, is represented as 1, January 2, 1900, as 2, and so on. Today's date, for instance, would be a five-digit number representing the total days passed since January 1, 1900. While this system allows Excel to perform complex date calculations with ease, it becomes problematic when you try to
combine dates directly with text using standard concatenation methods.
When you use the `&` operator or the `CONCATENATE` function to merge a cell containing a date with other text, Excel doesn't interpret the date's *displayed format*. Instead, it grabs the underlying *serial number* and includes that in your text string. For example, if cell B2 contains "01/01/2023" (formatted as a date), and you try `= "Today is " & B2`, the result would be "Today is 44927" – not very helpful for your audience.
This behavior, though logical from Excel's perspective, can be frustrating for users. The key to overcoming this challenge lies in explicitly telling Excel how to format the date's serial number *before* it gets joined with other text. This is precisely the role of the `TEXT` function.
Unlocking Correct Date Formatting with the TEXT Function
The `TEXT` function is designed to convert a numerical value into a text string with a specified format. Its syntax is straightforward: `TEXT(value, format_text)`.
*
`value`: This is the number you want to convert. In our case, it will be the Excel cell reference containing your date (which Excel sees as a number).
*
`format_text`: This is a string enclosed in double quotes that specifies the desired display format for your number. For dates, this is incredibly powerful, allowing you to dictate exactly how the date should appear.
Let's explore some common `format_text` options for dates:
*
`"dd/mm/yyyy"`: Displays the day, month, and year with leading zeros (e.g., "05/09/1999").
*
`"mm/dd/yyyy"`: Displays the month, day, and year (e.g., "09/05/1999").
*
`"d-mmm-yyyy"`: Displays the day, abbreviated month name, and year (e.g., "5-Sep-1999").
*
`"dddd, mmmm dd, yyyy"`: Displays the full day of the week, full month name, day, and year (e.g., "Wednesday, September 05, 1999").
*
`"mmm dd, yy"`: Displays abbreviated month, day, and two-digit year (e.g., "Sep 05, 99").
*
`"yyyy-mm-dd"`: A common ISO standard format (e.g., "1999-09-05").
By incorporating `TEXT(B2, "dd-mmm-yyyy")` into your concatenation formula, you're essentially telling Excel: "Take the date in B2, convert its serial number into a text string formatted as 'day-abbreviated month-year', and *then* combine it with everything else." This crucial step ensures that your final output displays the date exactly as you intend.
Step-by-Step Guide: Combining Dates and Text with TEXT and CONCATENATE (or &)
There are two primary ways to
combine dates with text in Excel once you understand the power of the `TEXT` function: using the `CONCATENATE` function or the `&` operator. Both achieve the same result, but personal preference often dictates which one you'll use. For a deeper dive into the nuances of these methods, you might find our article on
Master Concatenate Dates in Excel: TEXT Function Guide particularly useful.
Method 1: Using the CONCATENATE Function with TEXT
The `CONCATENATE` function allows you to join up to 255 text items into one text string. Each item (cell reference, text string, or function result) is separated by a comma.
Let's consider an example:
Suppose you have the following data:
*
A2: Daniel (Name)
*
B2: 05/09/1999 (Date of Birth)
*
C2: Canada (Place)
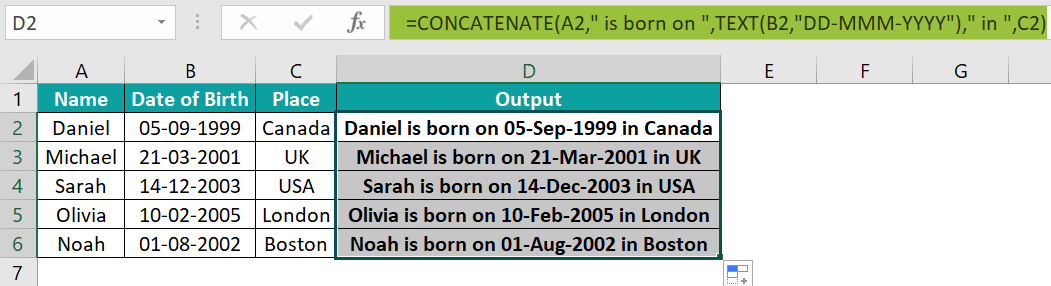
You want the output to be "Daniel is born on 05-Sep-1999 in Canada."
1. **Initial Attempt (without TEXT):** If you tried `=CONCATENATE(A2, " is born on ", B2, " in ", C2)`, the result would be "Daniel is born on 36411 in Canada" (assuming 05/09/1999 is serial number 36411). This is incorrect.
2. **Using TEXT for Correct Formatting:** To fix this, we'll embed the `TEXT` function for the date part.
*
Formula: `=CONCATENATE(A2, " is born on ", TEXT(B2, "DD-MMM-YYYY"), " in ", C2)`
*
Explanation:
* `A2`: Adds the name "Daniel".
* `" is born on "`: Adds the literal text.
* `TEXT(B2, "DD-MMM-YYYY")`: This is the crucial part. It takes the date from B2 and converts it into the text string "05-Sep-1999".
* `" in "`: Adds more literal text.
* `C2`: Adds the place "Canada".
*
Result: "Daniel is born on 05-Sep-1999 in Canada"
Method 2: Using the & Operator with TEXT (The Preferred Method for Many)
The `&` (ampersand) operator is a more concise and often preferred way to concatenate strings in Excel. It achieves the same result as `CONCATENATE` but can be simpler to type and read for shorter formulas.
Using the same example data:
*
A2: Daniel (Name)
*
B2: 05/09/1999 (Date of Birth)
*
C2: Canada (Place)
You want the output to be "Daniel is born on 05-Sep-1999 in Canada."
1. **Formula:** `=A2 & " is born on " & TEXT(B2, "DD-MMM-YYYY") & " in " & C2`
2.
Explanation: Each `&` joins the elements immediately before and after it.
* `A2 & " is born on "`: Joins the name with the introductory text.
* `& TEXT(B2, "DD-MMM-YYYY")`: Adds the correctly formatted date string generated by `TEXT(B2, "DD-MMM-YYYY")`.
* `& " in " & C2`: Appends the remaining text and the place.
3.
Result: "Daniel is born on 05-Sep-1999 in Canada"
Many users find the `&` operator more intuitive due to its simplicity, especially when merging just a few items. For complex scenarios involving many text strings, `CONCATENATE` (or the newer `CONCAT` function in Excel 2016 and later) might offer better readability by keeping arguments separated by commas. Whichever method you choose, remember that the `TEXT` function is the hero in ensuring your dates appear correctly. For further simplification of date merging techniques, our guide on
Simplify Date Merging: Concatenate & TEXT Functions in Excel provides additional insights.
Advanced Tips and Common Pitfalls
While the core principle of using `TEXT` for date concatenation is straightforward, a few advanced tips and awareness of common pitfalls can elevate your Excel skills.
Handling Multiple Dates in One String
You might need to combine multiple dates into a single output string. The `TEXT` function can be applied individually to each date cell you wish to include.
Example: "Event from 01-Jan-2023 to 03-Jan-2023"
If A2 has 01/01/2023 and B2 has 03/01/2023:
`="Event from " & TEXT(A2, "DD-MMM-YYYY") & " to " & TEXT(B2, "DD-MMM-YYYY")`
Adding Delimiters and Custom Text
Don't shy away from adding various delimiters (like "/", "-", or " | ") and custom descriptive text to make your concatenated strings more readable. Always enclose literal text and delimiters in double quotes `" "`.
Example: "Due Date: 15/Mar/2024 (Friday)"
If A2 has 15/03/2024:
`="Due Date: " & TEXT(A2, "DD/MMM/YYYY") & " (" & TEXT(A2, "DDDD") & ")"`
Here, `TEXT(A2, "DDDD")` extracts the full day name from the date.
Troubleshooting: #VALUE! Errors and Incorrect Date Formats
*
#VALUE! Error: This often occurs if the "value" argument in your `TEXT` function isn't a valid number or date. Double-check that the cell you're referencing actually contains a date Excel recognizes (not text that *looks* like a date). Sometimes, dates imported from other sources might be stored as text. You can try converting them using `DATEVALUE()` or `VALUE()` first, or by using Excel's "Text to Columns" feature.
*
Incorrect Date Format: If your date isn't appearing as expected (e.g., "Jan 1, 23" instead of "January 01, 2023"), carefully review your `format_text` argument within the `TEXT` function. Even a small typo like "mm" instead of "mmm" can change the output significantly. Refer back to the common `format_text` options for precision.
*
Locale-Specific Formatting: Be mindful of regional settings. "mm/dd/yyyy" might be standard in the US, while "dd/mm/yyyy" is common in the UK and many other countries. Ensure your chosen `format_text` aligns with your desired regional presentation, or use an unambiguous format like "YYYY-MM-DD".
By mastering the `TEXT` function, you gain significant control over how dates are presented within your concatenated strings, making your Excel output far more professional and user-friendly.
Conclusion
Effectively managing and presenting data in Excel often hinges on seemingly small details, such as how dates are displayed. While Excel's default behavior of treating dates as serial numbers can initially complicate concatenation, the `TEXT` function provides an elegant and powerful solution. By learning to
combine dates with text using `TEXT` alongside `CONCATENATE` or the `&` operator, you gain the ability to convert these numerical representations into any desired date format, ensuring clarity and professionalism in your reports and data summaries. This skill is not just about merging cells; it's about transforming raw data into meaningful, human-readable information, empowering you to create more impactful and accurate Excel documents. Keep experimenting with different format codes, and you'll quickly become a master of Excel date concatenation.